Create USB
Section outline
-
-
Download Ubuntu 24.04 LTS
- Visit the official Ubuntu download page.
- Download the latest Ubuntu 24.04 LTS Desktop ISO image.
- Save the ISO file to your computer (for example, in the Downloads folder).
Official Downloads
Create a Bootable USB Drive with Rufus
Requirements
- USB flash drive (8 GB or larger)
- Ubuntu 24.04 LTS ISO
- Rufus
Warning: Creating the bootable USB will erase all data on the USB drive.
Step 1 – Launch Rufus
Open Rufus after downloading it.
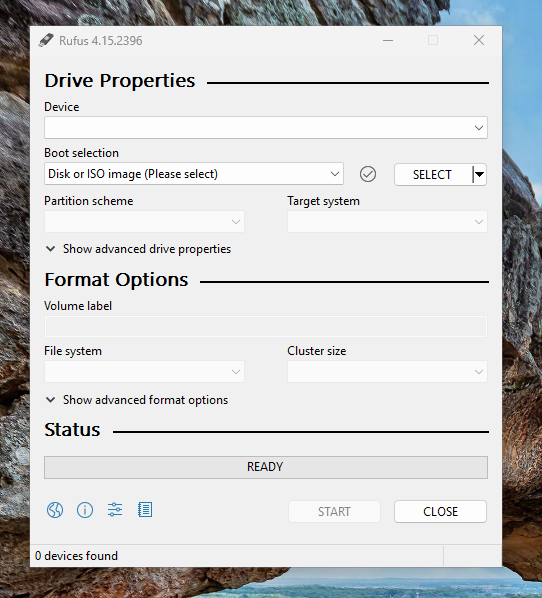
Step 2 – Insert the USB Drive
Connect your USB flash drive and select it under Device.
Step 3 – Select the Ubuntu ISO
- Click SELECT.
- Browse to the downloaded Ubuntu 24.04 ISO.
- Click Open.
Step 4 – Configure Rufus
For most modern computers, use:
Option Value Device Your USB drive Boot selection Ubuntu 24.04 ISO Partition scheme GPT Target system UEFI (non CSM) File system FAT32 (Default) Cluster size Default If your computer only supports Legacy BIOS, choose:
- Partition scheme: MBR
- Target system: BIOS (or UEFI-CSM)
Step 5 – Start Creating the USB
Click START.
When prompted:
- ISOHybrid image detected → Select Write in ISO Image mode (Recommended).
- If Rufus asks to download additional files, click Yes.
- Confirm the warning that the USB drive will be erased by clicking OK.
Step 6 – Wait for Completion
Rufus will write the Ubuntu image to the USB drive. This typically takes around 5–10 minutes, depending on your USB device.
Step 7 – Finish
When the status changes to READY:
- Click CLOSE.
- Safely eject the USB drive.
Boot from the USB
- Insert the USB drive into the target computer.
- Power on the computer.
- Open the Boot Menu (commonly F12, F11, Esc, or F9, depending on the manufacturer).
- Select the USB drive.
- Choose Try or Install Ubuntu.
- Follow the on-screen installation wizard to install Ubuntu 24.04 LTS.
-